Wednesday, November 28, 2012

Enabling File and Folder Auditing


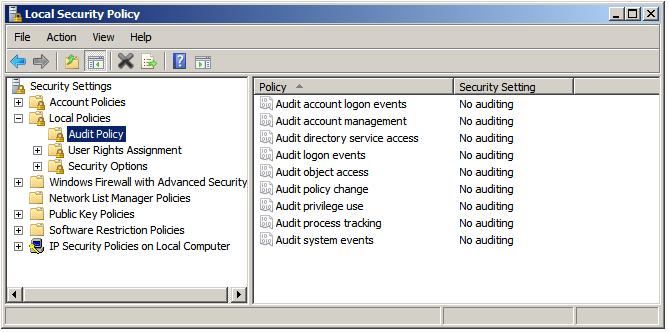
File and folder auditing is enabled and disabled using either Group Policy (for auditing domains, sites and organizational units) or local security policy (for single servers). To enable file and folder auditing for a single server, select Start -> All Programs -> Administrative Tools -> Local Security Policy. In the Local Security Policy tool, expand the Local Policies branch of the tree and select Audit Policy.

Configuring Local Audit Policy

Double click on the Audit Object Access item in the list to display the corresponding properties page and choose whether successful, failed, or both types of access to files or folders may be audited:
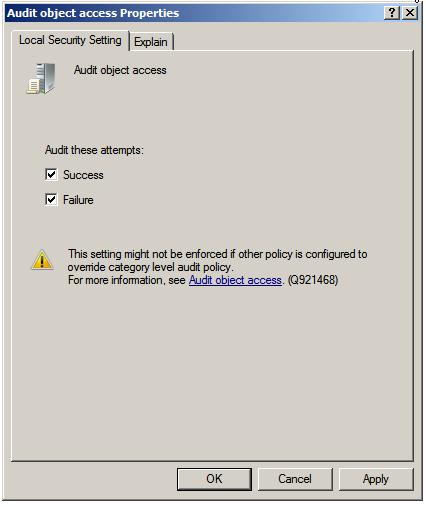

Setting the Audit Object Properties to enable file and folder access tracking

Once the settings are configured click on Apply to commit the changes and then OK to close the properties dialog. With file and folder auditing enabled the next task is to select which files and folders are to be audited.

Configuring which Files and Folders are to be Audited

Once file and folder access auditing has been enabled the next step is to configure which files and folders are to be audited. As with permissions, auditing settings are inherited unless otherwise specified. By default, configuring auditing on a folder will result in access to all child subfolders and files also being audited. Just as with inherited permissions, the inheritance of auditing settings can be tuned off for either all, or individual files and folders.
To configure auditing for a specific file or folder begin by right clicking on it in Windows Explorer and selecting Properties. In the properties dialog, select the Security tab and click on Advanced. In the Advanced Security Settings dialog select the Auditing tab. Auditing requires elevated privileges. If not already logged in as an administrator click the Continue button to elevate privileges for the current task. At this point, the Auditing dialog will display the Auditing entries list containing any users and groups for which auditing has been enabled as shown below:
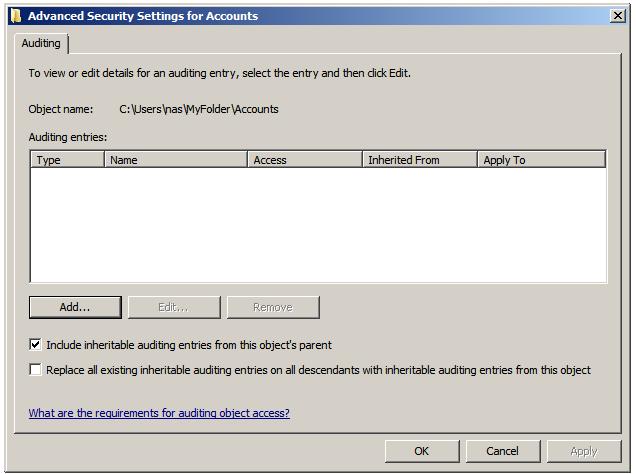
The file and folder auditing entries dialog

To add new users or groups whose access attempts to the select file or folder are to be audited click on the Add...' button to access the Select User or Group dialog. Enter the names of groups or users to audit, or Everyone to audit access attempts by all users. Click on OK to display the Auditing Entries for dialog as illustrated below:
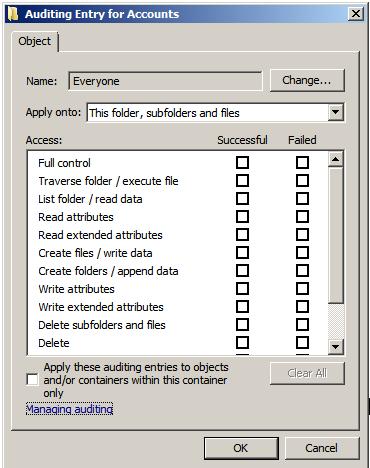
Configuring file and folder auditing for a specific user or group

Use the drop down list to control whether the auditing setting is to be applied to the current file or folder, or whether it should propagate down to all children files and/or sub-folders. Finally, select which types of access are to be audited and, for each type, whether successful, failed or both kinds of attempt are to be audited. Once configured, click on OK to dismiss current dialog and then Apply the new auditing settings in the Auditing Entries dialog.
From this point on, access attempts on the selected file or folder by the specified users and groups of the types specified will be recorded in the server's security logs which may be accessed using the Events Viewer, accessible from Computer Management.

src: http://www.techotopia.com/index.php/Auditing_Windows_Server_2008_File_and_Folder_Access

Tuesday, November 20, 2012

Easy way to install XP on several laptops?


I'd go with the idea of creating an nLite'd XP disc. This gives you the most control over what is installed on the laptops on the first hit, and will minimize the number of visits to Windows Update, reboots and prompts along the way. It will also let you trim down the install footprint, and allow you to specify the common settings.
First, determine the flavour(s) of Windows XP that you want to install on these 9 laptops. If you're considering making them all Pro or Home, then it's even less work for you. Each flavour would obviously need its own nLite'd disc.
If I were doing this job, I'd do this:
  • inventory all the laptops with their model numbers
  • for each older model, download the drivers (Audio, (W)LAN, Video, Bluetooth, trackpad, webcam, etc, etc.) from their respective manufacturer web sites. If none are available, hope that XP has them built in.
  • consider downloading the power management tools as well
  • rip the Win XP install CD to a directory
  • nLite it along with XP Service Pack 3 - Lifehacker has details!
  • include the drivers from point 2 in the nLite image. Sure, all laptops will have them installed, but no biggie.
  • consider the option of writing your newly created ISO to a bootable USB thumb-drive. This will cut down the installation time vs. optical media. Of course you'd be dependent on the ability for those Win98 vintage machines supporting this. Even still, the time saved on those others would still make it worthwhile.
*******************************************************************************************************

I'm definitely a fan of nLite. I'm not sure how many laptops you have to install, but I usually get an eOpen license from Microsoft.
They give you one license key that can be use on as many XP installs as you've purchased. You're also not restricted by the OEM licenses which say you can't transfer XP to a new computer. If you get Software Assurance with the eOpen licenses you automatically get upgrades to Vista, and Windows 7 for free.
eOpen copies of Windows are clean--they have no junkware installed by OEMs.
You can take the eOpen copy of Windows and run it through nLite to create an unattended install.
If the computers are joining a domain, you can also use group policy to automatically install needed software.
My nLited copy of XP will automatically wipe the HD, create one big partition, install a clean copy of XP without any prompts, and join the computers to a domain. Once joined, they automatically have Symantec AV, Office 2007, Java, Flash, etc... installed. The entire workstation is usually ready in about 45-60 minutes with no prompting.

source: http://serverfault.com/questions/75563/easy-way-to-install-xp-on-several-laptops

Monday, November 5, 2012

Edit all users start menu and desktop - add remove/delete shortcuts

Option 1:

%systemdrive%\ProgramData\Microsoft\Windows\Start Menu

with admin rights on TS in explorer

 Option 2:

All users default profile desktop

c:\users\Public\

Option 3:
src: http://social.technet.microsoft.com/Forums/en/winserverTS/thread/c06e553e-8903-48ef-bd07-e47b832ad264
To All,
There have been so good suggestions. But if you are using Windows 2008 AD and 2008 Terminal server, there is a much easier and better way to do this through GPO.
1. Open the GPO that is applied to your Terminal Servers OU
2. Go to Preferences under the User Configuration part of the GPO
3. Preferences - Control Panel Settings - Start Menu
4. Right Click - New - Start Menu (Windows XP) or Start Menu (Windows Vista or Later)
5. Make all the setting changes you wish to see on the Start Menu (no Network, Administrative Tools, etc.). You will want to choose Vista or later to remove Administrative Tools.
6. Set the order in which you wish to have it applied if you should have more than one. I recommend making it first in the order.
7. Gpupdate /force...possibly reboot Terminal Server
8. Done.

This...Is...Beautiful...Thank You!!