Friday, December 7, 2012

Here is how to unbrick your tplink TL-WR1043ND (and possibly others too)
First you will need to download putty and tftpd server
next you will need to find a USB to TTL cable
Once you have your cable refer to this picture to hook it up

http://wiki.openwrt.org/_media/inbox/wr1043ndserial.jpg

or look at  your board and you will see 4 pin sockets...
P1 - [vcc3.3v] [gnd] [rx] [tx]

SOme just stick a cable and tape it in each socket, I did a 5 min solder job and got in a staple pin in each socket and trimmed off the excess with a nail cutter.

Also i ordered a $3 usb to serial / ttl cable from China and it worked like a charm. mine is a 2303hx prolific.

REMEMBER TO REVERSE THE Tx and Rx with your cable !!! IMPORTANT !!!

NOTE: I didn't use the VCC connection only the GND Tx and Rx if you use the VCC use +3.3v connection

Once you have hooked up your cable correctly follow these instructions and you will be fine.
1. Download modified original firmware that has first 0x20200 cut off, or use any sysupgrade firmware. (I used a sysupgrade firmware)

2. Gain access to the serial port and hook it up to your computer using RS-232 / USB --> TTL adapter.
3. Install Putty, setup Serial connection, set COM port appropiately to your adapter in step 2 and do not click Open yet (baud rate: 115200 8N1 and set Flow Control to None)
4. set networkcard of computer to ip address: 192.168.0.5 , subnetmask 255.255.255.0 and no gateway
5. Install TFTP32 server (google it) on your computer, connect computer with ethernet cable to LAN switch port on router.
6. Make sure the "Current Directory" in TFTP32 is set to folder with modified original firmware renamed to "code.bin"
7. In Putty, click open and plug in Power cord to router... you should see bootloader coming up now...
8. You will see something like this:
No valid address in Flash. Using fixed address
: cfg1 0xf cfg2 0x7114
eth0 up
eth0
Autobooting in 1 seconds## Booting image bf0200000...
Then type following fast: tpl
Now you will get into the command prompt and you're able to execute commands.
9. Erase the firmware before writing it again using following command: erase 0xbf020000 +7c0000
10. Download new modified original firmware from computer to the router: tftpboot 0x81000000 code.bin
11. Write the downloaded firmware to flash using: cp.b 0x81000000 0xbf020000 0x7c0000
12. Boot the original firmware again: bootm 0xbf020000
13. Let the router finish booting up and wait for everything to stop loading
14. push ctrl + c than hit enter and now you should see the openwrt login screen
Your router should be unbricked again!
On step 1 it asks to use a specific file, but where to get it? Or what is sysupgrade firmware? Is the same of a firmware from dd-wrt?
just follow the wiki..
http://wiki.openwrt.org/toh/tp-link/tl-wr1043nd#back.to.original.firmware

4 (edited by Qopzeep 2012-11-25 16:36:23)

Thanks so much smile! I followed the guide and my router is now UNBRICKED! Here a little info for future router-brickers:
Instead of ordering a serial cable, which would've taken a few days to get here, I used my Arduino duemilanove as a serial cable. This worked great, for more details see this post: http://www.dd-wrt.com/phpBB2/viewtopic.php?p=725420. An Arduino diecimilia and I presume an Arduino Uno would work as well. Also, I didn't need to solder my wires to the board. I just used tin wires (the stiff ones, not the ones made from many small wires twisted together) and put them through the appropriate holes on the router board. Then I bent the wires so they couldn't move. Finally, I taped them down for good measure. No soldering required! big_smile
When wiring up Tx and Rx cables to the router, pay attention to what the terminal says. If it outputs characters like these:
Ýý     Ỳỳ     Ŷŷ     Y̊ẙ     Ÿÿ     Ỹỹ     Ẏẏ     Ȳȳ     Úú     Ùù     Ŭŭ     Ûû     Ǔǔ     Ůů     Üü     Ǘǘ     Ǜǜ     Ǚǚ     Ǖǖ     Űű     Ũũ     Ṹṹ     Ųų     Ūū     Ṻṻ     Ủủ     Ȕȕ     Ȗȗ     Ưư     Ứứ     Ừừ     Ữữ     Ửử     Ựự
Ụụ     Ṳṳ     Ṷṷ

etc., you've wired Tx and Rx the wrong way round. Switch them and you should be ok smile. The little Tx LED on your Arduino should light up everytime the router enters the boot cycle.
Also, I used software called 'Termite', instead of Putty, because Putty wouldn't work for me :S you can get Termite here if Putty won't play ball with you either: http://www.compuphase.com/software_termite.htm.
To understand how to open your router, follow the excellent guide on the OpenWRT wiki: http://wiki.openwrt.org/toh/tp-link/tl-wr1043nd#openingclosing.the.case.
I didn't have the option to CTRL+C in Termite, but after I was sure the router was performing normally again, I unplugged it from the power, then removed the wires to the Arduino, and plugged the power back in. I could now access the Luci (=web) interface of OpenWRT smile!
@hugoleosp as sysupgrade, I used the latest beta from the download section. It's 12.09 beta 2, available here: http://downloads.openwrt.org/attitude_a … actory.bin. This is for OpenWRT, however, not DD-WRT. If you prefer the latter, I'd download and use their latest release.
Wednesday, November 28, 2012

Enabling File and Folder Auditing


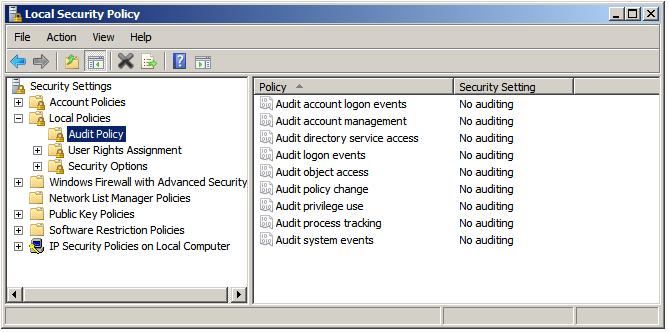
File and folder auditing is enabled and disabled using either Group Policy (for auditing domains, sites and organizational units) or local security policy (for single servers). To enable file and folder auditing for a single server, select Start -> All Programs -> Administrative Tools -> Local Security Policy. In the Local Security Policy tool, expand the Local Policies branch of the tree and select Audit Policy.

Configuring Local Audit Policy

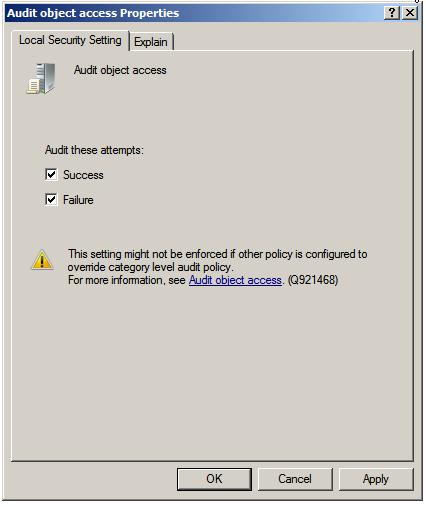
Double click on the Audit Object Access item in the list to display the corresponding properties page and choose whether successful, failed, or both types of access to files or folders may be audited:


Setting the Audit Object Properties to enable file and folder access tracking

Once the settings are configured click on Apply to commit the changes and then OK to close the properties dialog. With file and folder auditing enabled the next task is to select which files and folders are to be audited.

Configuring which Files and Folders are to be Audited

Once file and folder access auditing has been enabled the next step is to configure which files and folders are to be audited. As with permissions, auditing settings are inherited unless otherwise specified. By default, configuring auditing on a folder will result in access to all child subfolders and files also being audited. Just as with inherited permissions, the inheritance of auditing settings can be tuned off for either all, or individual files and folders.
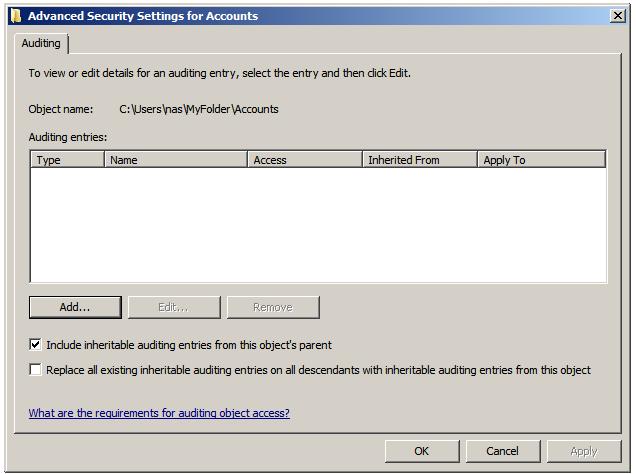
To configure auditing for a specific file or folder begin by right clicking on it in Windows Explorer and selecting Properties. In the properties dialog, select the Security tab and click on Advanced. In the Advanced Security Settings dialog select the Auditing tab. Auditing requires elevated privileges. If not already logged in as an administrator click the Continue button to elevate privileges for the current task. At this point, the Auditing dialog will display the Auditing entries list containing any users and groups for which auditing has been enabled as shown below:

The file and folder auditing entries dialog

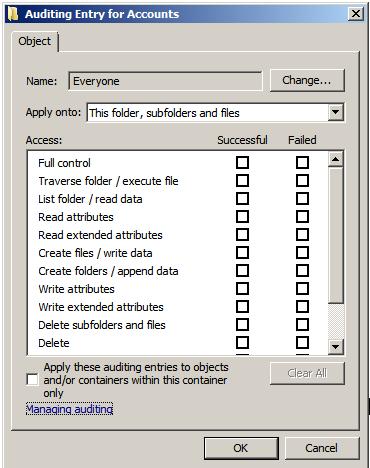
To add new users or groups whose access attempts to the select file or folder are to be audited click on the Add...' button to access the Select User or Group dialog. Enter the names of groups or users to audit, or Everyone to audit access attempts by all users. Click on OK to display the Auditing Entries for dialog as illustrated below:

Configuring file and folder auditing for a specific user or group

Use the drop down list to control whether the auditing setting is to be applied to the current file or folder, or whether it should propagate down to all children files and/or sub-folders. Finally, select which types of access are to be audited and, for each type, whether successful, failed or both kinds of attempt are to be audited. Once configured, click on OK to dismiss current dialog and then Apply the new auditing settings in the Auditing Entries dialog.
From this point on, access attempts on the selected file or folder by the specified users and groups of the types specified will be recorded in the server's security logs which may be accessed using the Events Viewer, accessible from Computer Management.

src: http://www.techotopia.com/index.php/Auditing_Windows_Server_2008_File_and_Folder_Access

Tuesday, November 20, 2012

Easy way to install XP on several laptops?


I'd go with the idea of creating an nLite'd XP disc. This gives you the most control over what is installed on the laptops on the first hit, and will minimize the number of visits to Windows Update, reboots and prompts along the way. It will also let you trim down the install footprint, and allow you to specify the common settings.
First, determine the flavour(s) of Windows XP that you want to install on these 9 laptops. If you're considering making them all Pro or Home, then it's even less work for you. Each flavour would obviously need its own nLite'd disc.
If I were doing this job, I'd do this:
  • inventory all the laptops with their model numbers
  • for each older model, download the drivers (Audio, (W)LAN, Video, Bluetooth, trackpad, webcam, etc, etc.) from their respective manufacturer web sites. If none are available, hope that XP has them built in.
  • consider downloading the power management tools as well
  • rip the Win XP install CD to a directory
  • nLite it along with XP Service Pack 3 - Lifehacker has details!
  • include the drivers from point 2 in the nLite image. Sure, all laptops will have them installed, but no biggie.
  • consider the option of writing your newly created ISO to a bootable USB thumb-drive. This will cut down the installation time vs. optical media. Of course you'd be dependent on the ability for those Win98 vintage machines supporting this. Even still, the time saved on those others would still make it worthwhile.
*******************************************************************************************************

I'm definitely a fan of nLite. I'm not sure how many laptops you have to install, but I usually get an eOpen license from Microsoft.
They give you one license key that can be use on as many XP installs as you've purchased. You're also not restricted by the OEM licenses which say you can't transfer XP to a new computer. If you get Software Assurance with the eOpen licenses you automatically get upgrades to Vista, and Windows 7 for free.
eOpen copies of Windows are clean--they have no junkware installed by OEMs.
You can take the eOpen copy of Windows and run it through nLite to create an unattended install.
If the computers are joining a domain, you can also use group policy to automatically install needed software.
My nLited copy of XP will automatically wipe the HD, create one big partition, install a clean copy of XP without any prompts, and join the computers to a domain. Once joined, they automatically have Symantec AV, Office 2007, Java, Flash, etc... installed. The entire workstation is usually ready in about 45-60 minutes with no prompting.

source: http://serverfault.com/questions/75563/easy-way-to-install-xp-on-several-laptops

Monday, November 5, 2012

Edit all users start menu and desktop - add remove/delete shortcuts

Option 1:

%systemdrive%\ProgramData\Microsoft\Windows\Start Menu

with admin rights on TS in explorer

 Option 2:

All users default profile desktop

c:\users\Public\

Option 3:
src: http://social.technet.microsoft.com/Forums/en/winserverTS/thread/c06e553e-8903-48ef-bd07-e47b832ad264
To All,
There have been so good suggestions. But if you are using Windows 2008 AD and 2008 Terminal server, there is a much easier and better way to do this through GPO.
1. Open the GPO that is applied to your Terminal Servers OU
2. Go to Preferences under the User Configuration part of the GPO
3. Preferences - Control Panel Settings - Start Menu
4. Right Click - New - Start Menu (Windows XP) or Start Menu (Windows Vista or Later)
5. Make all the setting changes you wish to see on the Start Menu (no Network, Administrative Tools, etc.). You will want to choose Vista or later to remove Administrative Tools.
6. Set the order in which you wish to have it applied if you should have more than one. I recommend making it first in the order.
7. Gpupdate /force...possibly reboot Terminal Server
8. Done.

This...Is...Beautiful...Thank You!!

Monday, October 29, 2012

How to Enable/Disable Multiple RDP Sessions in Windows 2008 or 2008 R2


By default, Windows 2008/2008R2 servers allow two simultaneous Remote Desktop sessions. You may choose to disable multiple RDP sessions if desired. If only one session is available and you take over another person's live session, you may choose to enable multiple RDP sessions. This article describes the process for disabling and enabling multiple sessions.

Disable Multiple RDP Sessions
  1. Log into the server using Remote Desktop
    • In Windows 2008 R2
      • Click Start > Administrative Tools > Remote Desktop Services > Remote Desktop Session Host Configuration.
    • In Windows 2008
      • Click Start > Administrative Tools > Terminal Services >Terminal Services Configuration.
  2. Double click Restrict Each User to a Single Session.
  3. Check Restrict each user to a single session.
Enable Multiple RDP Sessions
  1. Log into the server using Remote Desktop
    • In Windows 2008 R2
      • Click Start > Administrative Tools > Remote Desktop Services > Remote Desktop Session Host Configuration.
    • In Windows 2008
      • Click Start > Administrative Tools > Terminal Services >Terminal Services Configuration.
  2. Double click Restrict Each User to a Single Session.
  3. Uncheck Restrict each user to a single session.
  4. Click OK.

Article ID: 419, Created On: 4/9/2012, Modified: 9/24/2012

Creating a backup of my Android For Nook card

Creating a backup of my Android For Nook card
02-25-2012, 03:00 PM (This post was last modified: 03-03-2012 07:42 AM by androidfornook.)
Post: #1
Creating a backup of my Android For Nook card
I just bought an AndroidforNook SD card. It works great! How can I make a backup to my PC?
Find all posts by this user
Quote this message in a reply
02-25-2012, 08:16 PM (This post was last modified: 07-25-2012 10:24 PM by androidfornook.)
Post: #2
RE: Creating a backup
(02-25-2012 03:00 PM)gbolando Wrote:  I just bought an AndroidforNook SD card. It works great! How can I make a backup to my PC?

Glad you are enjoying your Android tablet! Backing up is easy and is a good idea, in case something happens to your card. I also have an online file sharing site where I store the images for customers who cannot back up their own.

Anyway, to back up your card, you need: 1) a Windows PC 2) a cardreader 3) your AndroidForNook card 4) Windisk32 Imaging program

Directions:

Go to this website Windisk32 Imager File Download and download the "win32diskimager-binary.zip" file. I use the maddog release (r23) because it creates smaller backup files. Download a version of your choosing and extract it to a folder anywhere on your computer (I use the downloads folder).

Open the extracted file folder and double-click on the Windisk32Imager file.

This is what you should see:

[Image: windisk32.png]

Put your AndroidForNook card in a cardreader and stick it in the USB or cardreader slot (depends on what type of adapter you have).

You want to "read" the files on your AndroidFor Nook card to an image on your PC:

[Image: windisk32_read.png]

[Image: save_image.png]

Using the image above as an example, Click on the blue folder and browse to a location on your PC where you want to store the backup. In this example, I selected my Documents folder. You will be prompted to type in a filename. Call it whatever you want, but I called mine "androidfornook". Make sure the file type is .img extension. Click "Save". Your screen will return to the main program window.

[Image: read_image.png]

Click the down arrow and select the drive letter that your card reader is. In my case, it is drive letter J: and the program automatically detected it for me.

Next Click "Read". It will start reading the files on your card and backing them up into an image file that you named (in my case, "androidfornook.img").

That is it!

Make sure you properly eject your AndroidForNook card before you remove it from your PC. Always do this, never remove the card without ejecting it. I have Windows7, so in the bottom right corner, I click on the up arrow, then select the little USB Plug with the green check mark, then click on the drive letter J: (see pic). Earlier versions of windows, you can use File Explorer and right click on the drive letter (J: for me), then select "eject".

[Image: eject_card.PNG]

Now if you ever want to restore your image to your card (maybe you messed something up and it won't boot - the most common reason is removing your card with the power on your Nook still or removing it from your PC without "ejecting" it), the process is very similar. Look at the image below:

[Image: windisk32_write.png]

Click on the blue folder and find the backup file. In my case it is in the C:\backups folder and is called "androidfornook.img".

Click on the down arrow and select the drive letter that your card reader is. In my case it is J: (the program automatically detected it).

Click the "write" button. WARNING: This will over-write anything on your SD card! Do NOT press the "write" button when you are MAKING a backup, only when you are restoring it.

Easy stuff. Have fun.
Find all posts by this user
Quote this message in a reply
03-31-2012, 02:19 PM
Post: #3
RE: Creating a backup of my Android For Nook card
tnx for this basic tutorial -
Is the entire uSD card read/written - ie, all the partitions - or only one ?
Is the image of the entire uSD area - ie, even the blank/empty areas.... or just the used data ?
Lastly - how big is the resulting image file ?
Find all posts by this user
Quote this message in a reply
03-31-2012, 08:41 PM
Post: #4
RE: Creating a backup of my Android For Nook card
(03-31-2012 02:19 PM)ps56k Wrote:  tnx for this basic tutorial -
Is the entire uSD card read/written - ie, all the partitions - or only one ?
Is the image of the entire uSD area - ie, even the blank/empty areas.... or just the used data ?
Lastly - how big is the resulting image file ?

Don't quote me (actually, when you reply it does quote me Angry) but when you use the imaging program, it completely overwrites anything on yourur card, so the entire card is written to.

Depending on which version of Windisk Imager you use, it appears to write differently. For example, the version I have posted on my file share sites is version r.22 It is fairly old compared to the latest release, but it creates only 4GB image files, no matter what size card you have created the image from. The newer versions of the program will create an image the exact same size as the card you own.

So, by deduction it would appear the older version either does some type of compression, or skips empty data blocks when it is reading your card, or both. The newer versions read/write empty spaces.

I have not had any problems using the older version and prefer to use it to conserve hard drive space. If anyone determines that it causes problems, I would definitely stop using it, but so far so good.

You can further reduce the size of the image file by using WinZip. For the Tablet images, it reduces the 4GB image file to about 130MB! That makes it very easy to upload and download from the fileshare site. The Nook color images are a little larger (300-400MB). The Phiremod images will only Zip to about 2GB - not sure why.

Hope this answers your questions. 
 
src: http://androidfornook.com/forum/showthread.php?tid=39&highlight=partitions

Copying - Expanding partitions on current Rom SD cards

Copying - Expanding partitions on current Rom SD cards
I have a Nook Color that has a wonderful N2A card (16gb) and works great...problem is I have about 13 gb used and want to use a new SanDisk 32gb sd card so I have additional space. How can (if possible) I copy the current N2A data & partition to my new 32gb sd card. I don't want to lose anything currently on the N2A card. Love my Nook!!

Also I purchased a 16gb Nook tablet for my daughter and made a rom card from your CM7 download to a 32 gb card for her...unfortunately she has the use of only 4 gb on the 32 gb sd card...can I change the partition to her 32gb (+/-) using a partition program.

I am reasonably proficient in working with computers, but need some reassurance from an expert as to how I can safely resolve these 2 separate issues.
Thanks for any help you can provide...love your forums.
Find all posts by this user
Quote this message in a reply
05-02-2012, 10:06 PM (This post was last modified: 05-02-2012 10:09 PM by androidfornook.)
Post: #2
RE: Copying - Expanding partitions on current Rom SD cards
Thank you for giving me a least 50% of your business! I guess I have no problem helping you with your N2A card either Smile

Did you buy an 8GB download? That would be the only reason you have 4GB of free space.

First the N2A card: You can transfer your N2A card to a larger card by first making a backup. Here is the thread that shows you how to do that: http://androidfornook.com/forum/showthre...partitions

After you create the backup, you need to "write" the backup to the new card. Directions for that are also in the previous thread.

After you write the image to the new card, you need to resize the partition (the 4th one) to get full use of the new storage on your 32GB card and your daughter's card. Here is a paste from a post I made on the B&N Book Clubs forum answering the same question:

--------------------------------------------------------------------------------
ts_hunter wrote:

.... I have a 8gb card and I reformatted it so it would show 8gb available. After I write the Team-B-CM7SD-Alpha_final.img image, the SD card shows that it is a 200mb card. Is there a way to make it be 8gb again and still have the image on there?

--------------------------------------------------------------------------------

It shows a 200 MB card because the Windisk32 imaging program creates 4 partitions on the card and the first partition is only 200MB:

The first partition is the boot partition which just has a few startup files. This is the only partition that you can see in Nook mode or when the card is in your cardreader, plugged into the PC.

The second and third partitions are hidden and contain the Android operating system. Don't even mess with them

The fourth partition is your available space to use for downloading and storing files. Since you have an 8GB card and the image you downloaded is created for a 4GB card, you have some unused storage you need to claim:

1. Download a free program called Mini Tool Partition Wizard from download.com and install it.

2. Insert your micro SD into a cardreader and plug it into your PC.

2. When you start the partition program, you will see a couple drives. One will be your hard drive (maybe you have more than one) and one will be your micro SD card.

3. You will notice the micro SD card has 4 partitions, as mentioned already - you are looking for the unallocated space to the right of the 4th partition. That is what you want to claim.

4. Click on the 4th partition to highlight it. Then go to the menu at the top and click "resize". I am doing this from memory, so I might not have the commands exactly right.

5. Click on the up/down arrow in the box to increase the size of partition 4. Max it out and make it as large as you can. Click OK or Save, whatever the option is.

6. Go to the top of the menu and click "APPLY". None of your changes will be committed until you click "apply".

7. After it is complete (wait for a dialogue box to appear saying the actions are complete), close the program and eject your SD card properly by right-clicking on the drive letter in Windows and select "eject". Do not remove the SD card from the PC until Windows says it is safe to do so, otherwise you could corrupt the files on the card.

8. Insert the card into your Nook (power is off!) and turn it on. It should boot right into Android! To boot back into Nook mode, you have to be in Android mode. Press the power button and select "reboot".

Have fun with your Android Tablet!

Dean

END OF B&N POST******************

After you have expanded the partitions on your cards, you should make another backup. This time the backup will include all of the space on your card, so if you ever have to write the image again, the partitions will be correctly sized. 
 
 
src: http://www.androidfornook.com/forum/thread-226-post-956.html